MVC4

Don’t use import-css directives when bundling

Consider the following code:

public ActionResult Index( )
{
  StyleBundle b = new StyleBundle( "~/b1");
  b.Include( "~/Content/base.css");
  BundleTable.Bundles.Add( b);
  return( View( "~/Src/b.cshtml"));
}

This Controller method creates a bundle and includes a css-file located at ~/Content/base.css and then returns the view. The css file looks like this :

@import "b2.css";
body
{
  font-family: Verdana;
  font-size: small;
}

This file imports another css file b2.css. This includes a style to render the ‘important’-div red:

#important
{
  color: #FF0000;
}

The last line in our C#-code renders file ~/Src/b.cshtml :

@System.Web.Optimization.Styles.Render( "~/b1")
<div id="important">This is important</div>

This file calls the Render from System.Web.Optimization.Styles. The purpose of the Optimization library is to minimize css-files and scripts when running a release build, saving you the hassle of manually creating minimized files. If you call on this Action in Visual Studio, optimisation is disabled because you’re running in debug-mode resulting in the following view :

result in debug mode

result in debug mode

You see a nice red sentence, just like expected. If you now publish a release build of this code, you’ll see the following :

release-mode

release-mode

The red sentence has turned black. What happened ? If you inspect the network traffic using F12-network, you see the following :

release-build traffic

release-build traffic

The imported css file is not found on the network, caused by optimisation failing to fetch the correct paths for imported css files.

Ergo : Don’t use bundling with imported css-files.

If in full control of your css-files, then don’t import css files using the ‘import’-directive. If you’re not in control of your css files (using jQuery, Openlayers, etc..) then don’t optimize your css files using bundling.

Notes:

  1. Optimisation failing isn’t noticed until you deploy a release build. Even if you run a release build local before deploying, a cached css maybe read thus fooling you. If you would inspect network traffic on a release build locally before deploying, you’d see it fails
  2. Optimization is turned on by the following line in Web.Config :
    <compilation debug="false" targetFramework="4.0"/>
    

    If you publish a release build, the attribute debug="false" is absent which results in ASP.Net using the default which is false:

    <compilation targetFramework="4.0"/>
    
  3. To quickly see if your optimized styles are rendering correct, you can also use the following statement in your C#-code :
    BundleTable.EnableOptimizations = true;
    

Using SSL during a certificate request

Creating a temporary website

If you need to request a certificate to use for a website, you need to generate a certificate request resulting in a certreq.txt you need for buying the actual certificate. Once the certreq.txt is generated, you can not use another certificate for your website because your request is still pending. The below figure shows the dialog you’ll see when trying to setup secure connections for a website for which a certificate request is pending:

request-pending

request-pending

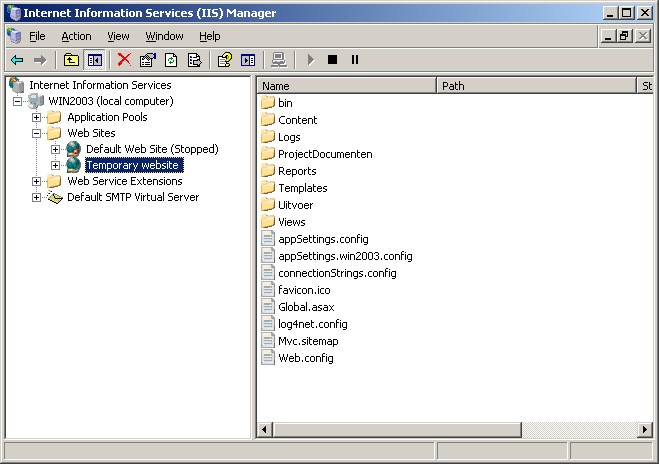
There can be days, even weeks between the actual request for buying a certificate and the moment it is delivered, which voids SSL-communications for your website. To avoid this, you can create a new website, then use a development certificate and use that for your site until your actual certificate is delivered.

Creating a temporary website

Creating a temporary website

If your actual certificate is delivered, you need to delete your temporary website and you can use the actual certificate.

Deploying an MVC4 Web application to Windows 2003

I had a hard time deploying an MVC4 application to Windows server 2003, so I thought I’d share my experience with you.
When deploying an MVC4-based website to Windows Server 2003, it is important to add Wildcard maps in Internet Information Services (IIS). The default IIS-configuration is based on extensions coupled to ISAPI-addins, but MVC doesn’t work with extensions so you need to tell IIS to have a ‘catch-it all’ extension. Here are the steps necessary to do so.

The target framework needs to be 4.0

If you develop a MVC4 website using Visual Studio 2012, the default .NET framework is 4.5. Windows 2003 doesn’t support the .NET framework 4.5 as you can read over here, so you need to downgrade the target framework to 4.0. You can easily do this with Visual Studio 2012 by changing the target framework in your project properties pages :

Target framework Visual Studio 2012 project

Target framework Visual Studio 2012 project

Installing the .Net 4 framework

The next step is to install the .NET framework 4.0. This comes in two flavours, the .NET 4 Framework Client Profile and the .NET 4 Framework which is the full framework. If you are deploying webapplications, you need the full framework, the Client Profile is a subset of the framework for desktop applications. You can read more about the differences over here. You can download the full redistributable of the .Net framework 4.0 at microsoft. After you installed the .NET 4.0 framework, you’ll see the following listing in installed programs :

.NET 4 framework installed

.NET 4 framework installed

The .NET 4 Framework Client Profile is the subset of the framework, the .NET 4 Framework Client Extended is the remainder making the full framework to be installed.

Configuring IIS to use .Net 4

After .NET 4 is installed, it is registered to IIS as an Web Service Extension, but it is not enabled by default:

ASP.Net 4.0 prohibited

ASP.Net 4.0 prohibited

Right click the ASP.Net v4.0.30319 line and select Allowed. After that, you should see the following screen :
ASP.Net 4.0 allowed

ASP.Net 4.0 allowed

Adding a Wildcard map

If you are deploying Web-Forms applications, then your done and your application should run. If you are working on MVC applications there’s one last step to do, you need to add a Wildcard map for your application. Go to IIS, select your project and choose Properties→Virtual Directory→Configuration and you’ll see the Application Configuration screen. In the lower part you can see a listing of installed wild card application maps, which is empty. You can add one by selecting the ‘Insert’ button:

Insert wildcard IIS map Virtual Directory

Insert wildcard map IIS Virtual Directory


The ‘Add/Edit Application Extension Mapping’ dialog shows up. In the Executable-text field, enter the path to the .NET Framework 4.0 isapi-extension which is normally c:\Windows\Microsoft.NET\Framework\v4.0.30319\aspnet_isapi.dll. Be sure to unselect the ‘Verify that file exist’-checkbox :

Add IIS wildcard

Add IIS wildcard


Choose ‘OK’ and close the screen. Your dialog should now look like this :
IIS Wildcard added

IIS Wildcard added


Close the screen, and your MVC4 application should now be ready to run!